Though iOS 9 helps you to fix many bugs and glitches, iPhone users encountered the issue keep freezing all the time due to the iOS 9 upgrade."My iPhone 6 freezes on the startup of iOS 9.1 upgrade, even the home and lock buttons stop working. How to fix iOS 9 freeze?" So what should you do if your iPhone 6s/6/5s/5c/5/4S freezes up or gets stuck during/after iOS 9 update? Here offers you several workable methods to fix the issue above:Solution 1: Hard resetResetting is a cliche because it works. Sometimes bits get stuck and there's nothing like hitting reset to get them going again.1. Press and hold down both the Sleep/Wake button and the Home button at the same time.2. Keep them held down until you see an Apple logo.3. Let go.Once your iPhone has rebooted, wait and see. If it finishes updating, you're good. If not, or if it won't reboot, go on to the next step.Solution 2: Plug into a wall outletThis sounds silly but it's worked for some people: plug in. It's possible that, during the install process, your iPhone dipped below a critical power level and that's why it's gotten finicky. Find an outlet or USB port, plug in, and wait 10-15 minutes. Then, see if it resumes and try a hard reset to make sure. If it goes back to working, great. If not, keep reading!Solution 3: Restore in iTunesIf you've been backing up the way you should, you can restore your iPhone in iTunes. First try doing it the normal way and, if that doesn't work, go for recovery or DFU mode.How to restore your iPhone in iTunes1. Connect your device to your computer using the cable that came with it.2. Select your iPhone when it appears in iTunes. 3. In the Summary panel, click Restore.4. Click Restore again to confirm that you want to restore your device to factory settings and delete all data and content. iTunes will download the device software file and restore your device.How to put your iPhone in recovery mode1. Connect your USB cable to your computer but not to iPhone2. Turn off the device: Press and hold the Sleep/Wake (Power) button for a few seconds until the red slider appears, then slide the slider. Wait for the device to turn off.If you cannot turn off the device using the slider, press and hold the Sleep/Wake and Home buttons at the same time. When the device turns off, release the Sleep/Wake and Home buttons.3. Now while pressing and holding the Home button down, connect the USB cable to the iPhone. The device should turn on.4. Continue holding the Home button until you see the Connect to iTunes screen. When the message screen appears, you can release the Home button.
Note: If the image of a battery appears, let the device charge for at least ten minutes to ensure that the battery has some charge, and then start with step 2 again. If you don’t see the Connect to iTunes screen, try these steps 1 through 4 again.5. iTunes will launch automatically inform you that your device is in recovery mode and that you need to restore the device. Note: If iTunes not open after two minutes, please open iTunes yourself. 6. Click on the “Ok” button and then click on “Restore” button to restore the device.7. After the device has been restore, follow the on-screen instructions to set it up, and recover from the backup.You'll need to restore from an iTunes or iCloud backup to get all your content back onto your iPhone or iPad, but once done, you'll be good to go. If even that doesn't work, you have one more things to try...After your device is restored to factory settings, it will restart. When it does, you’ll see the "Slide to set up” welcome screen. Follow the steps in the setup assistant. You can set up your device as new or use a previous backup. If you restored an iOS device that has cellular service, it will activate after you finish setting up your device.Solution 4. Go to AppleSometimes hardware or software picks update time to fail. If that's the case and you live close to an Apple retail store. If you don't live close to an Apple Store, give 1-800-MY-APPLE a call instead.Repair iPhone 6s/6/5s/5c/5/4S Operating SystemNote: If you've found all methods above can't fix iphone freeze during update, I think that you may have to repair the iOS operating system to get your frozen iPhone back to normal now. Luckily, Wondershare Dr.Fone for iOS (Mac) offers the unique " Fix iOS to Normal" feature, making it easy for users to get iPhone of white screen, Recovery Mode, Apple logo, black screen, and fix the issues when your iOS device perform abnormally. It can't cause any data loss while repairing the operating system of your iOS device. So make sure you've backed your iPhone up before the repair. Windows version is here.Download Mac iPhone Data Recovery Software:
 How to Repair iPhone 6s/6/5s/5c/5/4S Operating SystemStep 1. Connect your iPhone to computer After download, install and start the Mac iPhone data recovery software, you need to Connect your iPhone to your computer with a USB cable. You can see the main interface of the software.Step 2. Choose "Repair Operating System"In the main windo, click the "Repair Operating System"and you can see some notes diaplayed in the window. If you have no problem with all the changes it will bring, click "Next".Important: Please note that by fixing the issue - iPhone stuck in Apple logo, the iOS operating system on your iPhone will be updated to the latest version. And if it is jail-broken iPhone, then it will be updated to none jail-broken.
 Step 3. Download official firmwareIn the new window, the official firmware download link for your iPhone will be provided. You should download the firmware. If you have downloaded it before, then here you just need to choose "Already downloaded" to browse your computer to locate it.
 Step 4. Fix iPhone Stuck on Apple logo.After downloading and selecting the official firmware for your iPhone (iOS 9 supported), you should click the button "Start Fix" to let the program to fix the abnormal issue for you. After then, you just need to wait for your iPhone to restart. You can see that iPhone starts to work without any problem.
 Buy iPhone Data Recovery Software for Mac/Win now:
 Related Software:Wondershare TunesGo (Mac): Frees your music anywhere from iPhone, doing what iTunes can’t.Wondershare Dr.Fone for Android (Mac): A quick way to recover your lost or deleted data from Android .Wondershare MobileTrans for Mac: One-click phone transfer tool to let you transfer data between Android, iOS, and Symbian devices. iFastime Video Converter Ultimate for Mac: Make all your Blu-ray, DVD collections and movie library compatible with iPhone.Have more questions about how to fix iOS 9 Update Freezing Issues on iPhone 6s/6/5s/5c/5/4S, please feel free to contact us>> or leave a message at Facebook.More Topics:
Source: http://bestdatarecovertips.altervista.org/fix-frozen-iphone-during-ios-9-update/
Related Software:Wondershare TunesGo (Mac): Frees your music anywhere from iPhone, doing what iTunes can’t.Wondershare Dr.Fone for Android (Mac): A quick way to recover your lost or deleted data from Android .Wondershare MobileTrans for Mac: One-click phone transfer tool to let you transfer data between Android, iOS, and Symbian devices. iFastime Video Converter Ultimate for Mac: Make all your Blu-ray, DVD collections and movie library compatible with iPhone.Have more questions about how to fix iOS 9 Update Freezing Issues on iPhone 6s/6/5s/5c/5/4S, please feel free to contact us>> or leave a message at Facebook.More Topics:
Source: http://bestdatarecovertips.altervista.org/fix-frozen-iphone-during-ios-9-update/
Compared to SMS, MMS has large capacity of carrying data and also with faster speed. Many people like to save some interesting multimedia messages on their device. However, you may lose MMS from iPhone 6S after upgrading to iOS 9. When you lose the multimedia messages, do you know how to get them back? In fact, with an iPhone MMS recovery program, it would be very easy for you to recover MMS from iPhone 6S.
Here I will introduce Wondershare Dr.Fone for iOS (Mac) to you. It is a very good choice if you want to restore iPhone 6S MMS. This software is especially designed to recover the lost data from every iPhone series like iPhone 6S Plus/6/5S/5C/5/4S etc. It can also recover text messages, photos, notes, contacts, call history, videos and many more. This article offers you three solutions to recover deleted MMS from iPhone 6S with the help of iPhone Data Recovery, so you can choose the one you need!
If you are a windows user, you can go to windows version.
Methods to recover lost iPhone 6S MMS after upgrading to iOS 9
Part 1: Directly Retrieve MMS from iPhone 6S
Step 1. Choose your device model and scan it: Download and install this tool first. Then plug your device into your computer. Choose "Recover from iOS Device" on top of the program's window. When your iPhone 6S is detected, click "Start" on the program to begin scanning it.
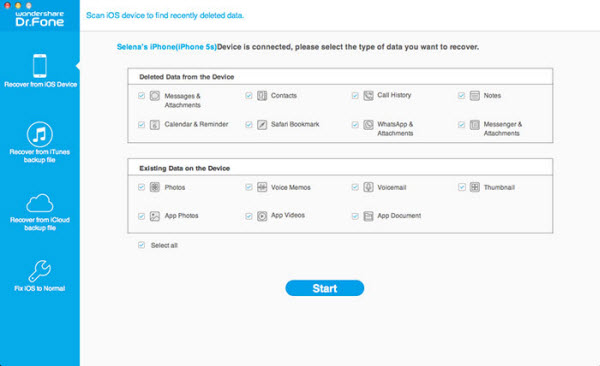 Step 2. Preview and retrieve MMS directly from device: After a few seconds, you’re able to see several file categories in the interface. Go to the “Messages” category and preview the multimedia messages in it. After previewing, you can hit the “Recover” button at bottom.
Part 2: Recover iPhone 6S MMS from iTunes Backup Files
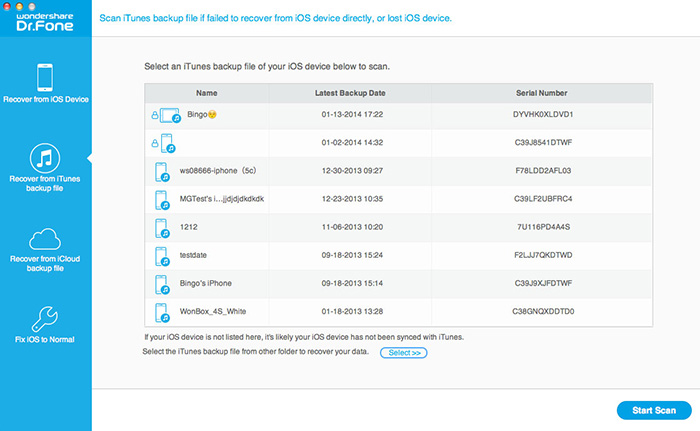
Step 1. Choose an iTunes backup file and scan it: Start the program, and select "Recover from iTunes Backup Files". Then you'll see a list of all your iTunes backup files on the computer. Choose one containing your iPhone 6S MMS and click "Start Scan" to extract it.
Step 2. Preview and retrieve MMS directly from device: After a few seconds, you’re able to see several file categories in the interface. Go to the “Messages” category and preview the multimedia messages in it. After previewing, you can hit the “Recover” button at bottom.
Part 2: Recover iPhone 6S MMS from iTunes Backup Files
Step 1. Choose an iTunes backup file and scan it: Start the program, and select "Recover from iTunes Backup Files". Then you'll see a list of all your iTunes backup files on the computer. Choose one containing your iPhone 6S MMS and click "Start Scan" to extract it.
Step 2. Preview and retrieve your iPhone 6S MMS: After scanning, all files will be grouped into several categories. Go to the "Messages" category and preview the details. To restore the MMS, you can check the boxes in front of them and click "Recover" to retrieve them to your computer. After a while, you can retrieve all your data.
 Part 3: Recover iPhone 6S MMS from iCloud Backup Files
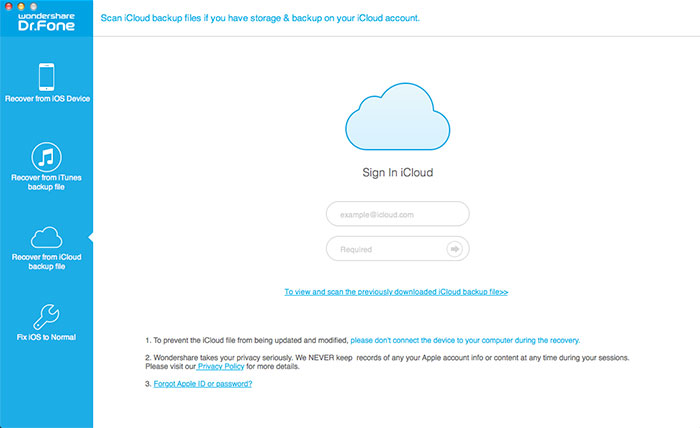
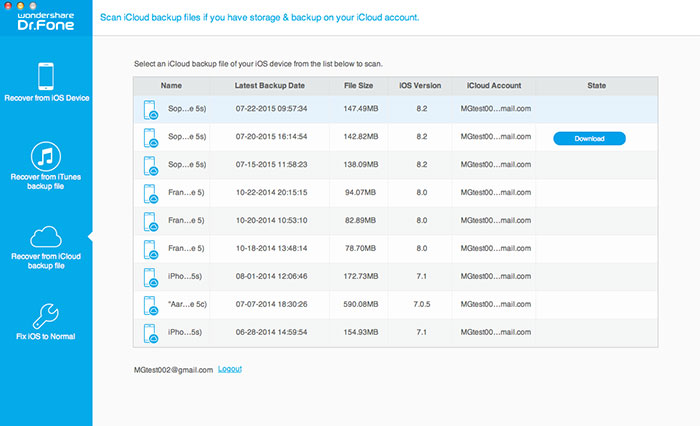
Step 1. Sign in iCloud to download the backup: Choose "Recover from iCloud Backup File" from the top menu. Then enter your iCloud account to log in. After that, you can see all your iCloud backup files there. Choose one and click "Download" to get it off.
Part 3: Recover iPhone 6S MMS from iCloud Backup Files
Step 1. Sign in iCloud to download the backup: Choose "Recover from iCloud Backup File" from the top menu. Then enter your iCloud account to log in. After that, you can see all your iCloud backup files there. Choose one and click "Download" to get it off.
Step 2. Extract your iCloud backup: The downloading process will take you a few minutes. When it's complete, you need to continue extracting it by clicking on the "Scan Downloaded", so that you can access the content in the backup.
Step 3. Preview and recover iPhone 6S MMS: Once all are ready, you can view the content of your iCloud backup now. Check your MMS in the category of "Messages" and "Message Attachments". Tick the items that you plan to get back and click "Recover" to save them on your computer.
Buy iPhone Data Recovery Software for Mac/Win now:
Related Software:
Wondershare TunesGo (Mac): Frees your music anywhere from iPhone 6S, doing what iTunes can’t.
Wondershare Dr.Fone for Android (Mac): A quick way to recover your lost or deleted data from Android .
Wondershare MobileTrans for Mac: One-click phone transfer tool to let you transfer data between Android, iOS, and Symbian devices.
iFastime Video Converter Ultimate for Mac: Make all your Blu-ray, DVD collections and movie library compatible with iPhone 6S.
Have more questions about how to get back lost MMS on iPhone 6S after iOS 9 upgrade, please feel free to contact us>> or leave a message at Facebook.
More Topics:
In daily life, it is very likely that iMessages from iPhone 6S get lost during the updating process, Besides new iOS update, iMessages can get lost owning to: wrong operation, e.g. mistaken deletion of iMessages; iPhone Jailbreak; iPhone factory settings restore; iPhone has been lost or stolen; iPhone was damaged, broken.
 Is there any way to get these iMessages back? Don’t worry, the only thing you need to do is to downloadWondershare Dr.Fone for iOS (Mac). It is a professional iPhone deleted iMessage recovery tool that tells you how to get back deleted iMessages on iPhone 6S. It offers you 3 options to recover your iMessages: recover iMessages directly from iPhone, extract iPhone iMessages from iTunes backup and retrieve iPhone iMessages from iCloud backup. Besides iMessages, it can also retrieve other text messages from iPhone 6S, iPad, iPod, etc.
If you are a Windows user turn to Wondershare Dr.Fone for iOS
Download Mac iPhone Data Recovery Software:
3 Solutions to Retrieve Deleted Text iMessages from iPhone 6s
Solution 1: Recover from iPhone
Is there any way to get these iMessages back? Don’t worry, the only thing you need to do is to downloadWondershare Dr.Fone for iOS (Mac). It is a professional iPhone deleted iMessage recovery tool that tells you how to get back deleted iMessages on iPhone 6S. It offers you 3 options to recover your iMessages: recover iMessages directly from iPhone, extract iPhone iMessages from iTunes backup and retrieve iPhone iMessages from iCloud backup. Besides iMessages, it can also retrieve other text messages from iPhone 6S, iPad, iPod, etc.
If you are a Windows user turn to Wondershare Dr.Fone for iOS
Download Mac iPhone Data Recovery Software:
3 Solutions to Retrieve Deleted Text iMessages from iPhone 6s
Solution 1: Recover from iPhone
Step 1: Find deleted iMessages on iPhone
Firstly, connect your iPhone to your computer. Then run Wondershare Dr.Fone for iOS and click on the “Start Scan” button appearing in the window to scan your iPhone. Don't disconnect your iPhone during the scanning process.
Step 2: Preview and recover iPhone iMessages
When the scan is complete, you can choose iMessages and Message Attachments to preview all of the found iMessages one by one. Then selectively recover the items you need. When clicking “Recover”, a pop-up will ask you to recover to your device or computer. If you choose “Recover to Device”, then recovered iMessages will be saved to your iPhone 6S. Also, you can save them to your computer as well. Besides, the deleted iMessage contents can be found too, including text, emoji and attachments.
Solution 2: Recover from iTunes
Step 1: Scan to Extract your iTunes backup
Choose the recovery mode of Recover from iTunes Backup File first. Then select the backup you want to recover iMessage from in the list, and click on the “Start Scan” button to extract the backup content. All backup files existing on your computer are available for extraction.
Step 2 Preview and retrieve iMessages for iPhone
The scan only takes you a few seconds. After it, you can preview and recover any messages in the menu of iMessages and Message Attachments. When click “Recover”, you'll be asked to recover to your device or computer. If you keep your iPhone connected to your computer via the USB cable, then choosing “Recover to Device” will save iMessages to your iPhone. If not, then the iMessages will be saved to your computer.
Solution 3: Recover from iCloud
Step1: Download and extract your iCloud backup
Switch to the recovery mode of Recover from iCloud Backup File on the top of the program's window.
Then log in your iCloud account. After that, choose the backup file you want to download it. In the new pop-up, check “message” and “message attachments” to download. By doing this, it only download text messages and the attachments, saving you time.
Step 2 Preview and recover iPhone iMessages
Once the scan stops, you can preview all the iMessages in the iCloud backup file. Choose the iMessages you need and click “Recover”. Both “Recover to Device” and “Recover to Computer” are available. I suggest you connect your iPhone with your computer through a USB cable and choose the “Recover to Device”. It's more convenient for you to view the iMessages on your iPhone than on your computer.
Buy iPhone Data Recovery Software for Mac now:
More reading:
iMessage is Apple's built-in instant messaging (IM) service. It lives inside the iMessages app on iPhone and iPad. On the iPhone it works alongside and often replaces carrier SMS and MMS. On the iPad provides similar functionality, allowing you to send text, picture, video, voice memo, location, contact, and other types of messages to anyone else using an iPhone, iPad, or Mac. Since there's no charge for iMessage beyond data (cellular or Wi-Fi), you can send unlimited iMessages pretty much for free.
Related Software:
Wondershare TunesGo (Mac): Frees your music anywhere from iPhone, doing what iTunes can’t.
Wondershare Dr.Fone for Android (Mac): A quick way to recover your lost or deleted data from Android.
Wondershare MobileTrans for Mac: One-click phone transfer tool to let you transfer data between Android, iOS, and Symbian devices.
iFastime Video Converter Ultimate for Mac: Make all your Blu-ray, DVD collections and movie library compatible with iPhone.
Have more questions about how to recover deleted iMessages from iPhone 6S, please feel free to contact us>> or leave a message at Facebook.
More topics:
Source: http://bestdatarecovertips.altervista.org/recover-deleted-imessages-from-iphone-6s/
Apple’s iOS 9.0.2 update is avaliable and it’s a small upgrade that tackles some big problems. ... Now would be a good time to back up your iPhone 6s on a regular basis before upgrading which will save you a lot of headaches if your phone fails or gets lost in the future. There are many ways to back up and restore files on an iPhone 6s, we will cover just the basics 6 ones. 1. Backing up with iCloudAn item of note before I explain the backup process: Apple has changed their iCloud storage tiers over time. You can see the current plans here, or by going to Settings → iCloud → Storage → Change Storage Plan.For the US, the current plans and pricing are:
- 5 GB — Free (same as ever)
- 50 GB — $1/month
- 200 GB — $3/month
- 1 TB — $10/month
While I do wish 50 GB was the free plan, Apple has matched Dropbox on the 1 TB option and lowered the pricing elsewhere. 50 GB will cover the vast majority of people’s backup needs.With that said, here’s how to back your data up to iCloud. First, let’s determine what you want to include in (or exclude from) the backup. To do that, navigate to Settings → iCloud → Storage → Manage Storage → Choose your device under ‘Backups’.Under Backup Options you will see a list of toggles for the photo library and every app on your device, sorted by file sizeEverything will be toggled on by default, so turn off any items you’d rather not back up. If you’ve upgraded to one of the new storage tiers listed above and space is no concern, then we recommend leaving everything on.Once you’ve determined what to back up, make sure the device is on a Wi-Fi network and, for best results, connected to a power source (this process can take a while). Now, navigate back to Settings → iCloud → Backup and ensure iCloud Backup is toggled on. If it is, you’ll see a Back Up Now option. Just tap that button and wait for the process to complete.Also note that iCloud backups can happen automatically at night. Assuming your iPhone 6S is plugged in and charging and is also connected to a Wi-Fi network, it will automatically back up to iCloud. If you’ve been running the iOS 9 betas on your iPhone 6S, be sure that it has a current backup before setting up. Some versions of the public beta had issues making iCloud backups.Issues with backing up iPhone 6S data via iCloud1. iCloud doesn’t work if you use iPhone under iOS 6 or iOS 5;2. iCloud can’t restore parts of data selectively.3. You are allowed to get 5 GB of free iCloud storage. And you can’t backup to iCould if you don’t have enough space2. Backing up with iTunesAn iTunes backup is a great option if: (a) you need more space than the free/paid tier of iCloud storage you have allows; or (b) you want an extra layer of backup in addition to your iCloud backup.The process is simple:
- Plug your device into your Mac or PC.
- Open iTunes and select the iDevices icon in the upper-left corner.
- Click the Summary tab and scroll down to the Backups section.
- Click the Back Up Now button and wait for the backup to complete.
- To verify that the backup worked, open iTunes Preferences and select the Devices tab. If the backup was successful, you’ll see it listed there.
It’s not as slow as iCloud, but can still take a while if you’re not in the habit of regularly backing up your device. If you don’t keep local copies of your applications stored in iTunes, you’ll want to transfer purchases before trying to restore to a new phone. You can do from File → Devices → Transfer Purchases. Once your new phone is restored and all your apps have been reloaded, you can delete the apps off your Mac to save space.Issues with backing up iPhone 6S data via iTunes:1. iTunes may ask you to sync or upgrade your iPhone 6S and wipe all the contents.2. iTunes can’t selectively backup data, it will takes you a few hours each time the iPhone backs up since doing an image backup.3. Backing up with MobileTransRun and Install MobileTrans on your computer, and connect your old idevices and new one to it via 2 USB cables > Select the content you want to backup > Start Copy. In the pop-up dialog, you can see the transfer progress. When it’s finished, the data on your old data will be transferred to your new iPhone 6S.4. External Hard DriveThe iTunes library is a database iTunes uses to organize your music and movies. The best way to back up your iTunes library is to consolidate your library into one folder and then copy that folder to an external hard drive. Here are official steps on how to backup iTunes library to external hard drive.5. Sync iPhone 6S Data to GoogleTo backup iPhone 6S data without iTunes, you can choose to sync iPhone 6S Mail, Calendar, and Contacts to Google. Here is a step-by-step guide to set up Google Sync with your iPhone 6S. Note: Google Sync is only supported on Apple iOS versions 3.0 and above6. Using a Third-party iPhone 6S Backup SoftwareNot only being taken as an iPhone 6S Data Recovery, Wondershare Dr.Fone for iOS (Mac) can also flexibly and selectively backup files from iPhone 6S to computer. With it, you can scan files like photos, contacts, SMS, voice memos, reminders, call history, SMS attachments, Safari bookmarks and more saved on your iPhone, and you are allowed to preview all files and select which are important to save on your computer. Windows users can refer to this review.Tips: Highly recommend iOS backup before:
- Accidently deleted files.
- Restored to Factory settings without backup.
- Lost iPhone 6S data due to jailbreak or iOS update.
- iDevices were inaccessible when it is stuck in Apple logo screen, locked with passcode.
- iOS devices was lost, broken, wet or stolen.
- Getting a new iPhone 6S.
- Sync with iTunes.
This iOS data recovery works when you lost iPhone data due to above reasons. Download, install and launch this iOS Backup and Data Recovery software. Related Software:Wondershare TunesGo (Mac): Frees your music anywhere from iPhone 6S, doing what iTunes can’t.Wondershare Dr.Fone for Android (Mac): A quick way to recover your lost or deleted data from Android.Wondershare MobileTrans for Mac: One-click phone transfer tool to let you transfer data between Android, iOS, and Symbian devices. iFastime Video Converter Ultimate for Mac: Make all your Blu-ray, DVD collections and movie library compatible with iPhone 6S.Have more questions about how to backup your iPhone 6S on Windows and Mac, please feel free to contact us>> or leave a message at Facebook.More Topics: